Create a Twisted Vase Pattern in Fusion — With a Simple, Repeatable Workflow
Some Fusion designs look complex at first glance, but once you understand the workflow behind them, they become surprisingly approachable. This vase pattern is one of those projects. It looks intricate, but the method behind it is clean, logical, and built around tools that give you maximum control with minimal effort.
Before we dive in, here’s what you’ll learn and why these techniques matter for anyone combining Fusion with 3D printing.
What You’ll Learn
- How to set up a clean, fully constrained base sketch that keeps your model stable as you iterate
- How to use splines, offsets, and revolve intelligently to control surface flow
- Why Surface Loft is ideal for open-geometry pattern guides
- How to thicken, split, and intersect bodies to create a pattern that perfectly follows curved surfaces
- How to use planes, projections, and reference geometry for precise alignment
- How to manage appearances and colors for clean 3D-printable results
- How parametric editing lets you reshape the entire pattern instantly
Watch the Workflow — or Read It Step by Step
You can follow this guide in two ways:
- Read the steps below if you want quick written instructions, reference images, and modeling notes.
- Watch the full video at the end of this post to see the workflow in real time — including extra tips, camera angles, and shortcuts that don’t fit neatly into text.
Both formats build on each other.
Reading helps you understand why each step matters, while watching shows how to move faster in Fusion.
Step 1 — Build a Fully Constrained Base Sketch
Start with a vertical line at 100 mm (the vase height).
Add two horizontal lines to fully constrain the sketch.
Fully constraining early keeps your timeline stable and prevents strange geometry shifts later — a common beginner issue.
This sketch defines the main profile of the vase. It includes a 100 mm vertical height, a 25 mm top width, and a fit point spline (step 2) that shapes the curved silhouette. Fully constraining this sketch (not shown in the screenshot) keeps the design stable and ensures later features—like the revolve and surface operations—update cleanly.
Step 2 — Shape the Profile with a Fit Point Spline
Draw a Fit Point Spline that extends slightly above and below the vase height.
Refine the curve using the green spline handles.
Offset the spline by 1 mm and close it into its own profile.
Overshooting the spline gives you trimming room later.
The offset profile becomes crucial during the intersect operation (step 8).
Step 3 — Revolve the Main Vase
Use Revolve on the original spline profile.
Revolve around the axis through the origin to keep the vase perfectly centered.
Centering early ensures cleaner circular patterns and mirrored geometry later.
Here the sketched profile is revolved around the center axis to form the hollow vase shape. The 360° revolve generates a smooth, continuous body that becomes the foundation for the twisted surface pattern added later in the workflow.
Step 4 — Create Two Offset Planes
Make one plane above the vase and one below it (around 10 mm each).
These planes will hold the guide lines for the surface pattern.
Keeping planes near the body makes sketching quicker and easier.
Two offset planes are added to control where the twist pattern starts and ends. These planes create clean boundaries for sketching guide lines and help maintain symmetry as the surface is lofted around the vase.
Step 5 — Sketch the Pattern Guide Lines
On the top plane: sketch a straight line.
On the bottom plane: sketch another line, but angled.
This angle controls the twist of the final pattern.
Change it later, and the entire pattern updates instantly — one of the strengths of parametric modeling.
A 135° arc and angled lines are sketched on the offset plane to set up the twist direction. These guide curves control how the surface rotates as it moves from the lower offset plane to the upper one, giving the vase its distinct twisted look.
Step 6 — Connect the Guide Lines with Surface Loft
Use Surface Loft between the two lines.
This creates a smooth open surface — something solid loft can’t handle as cleanly.
Surface Loft is perfect when working with open curves or when defining flowing surfaces.
The loft connects the bottom and top profiles while following a guide curve, generating a twisted surface that wraps around the vase. This surface will later be thickened and used to cut a repeating pattern outside the solid vase body.
Step 7 — Thicken the Loft
Thicken the loft symmetrically by 1 mm.
Create it as a New Body for cleaner organization and easier multicolor exporting.
Symmetric thickening keeps the pattern centered on the guiding surface.
The lofted surface is thickened symmetrically by 1 mm, creating a solid body that wraps around the vase. This step converts the surface into a usable cutting tool for building the outer pattern structure.
Step 8 — Trim the Pattern with Revolve Intersect
Turn on the offset spline sketch.
Use Revolve → Intersect with the offset profile to cut the pattern so it perfectly matches the vase shape.
Intersect is powerful because it trims with mathematical precision, not manual guesswork.
Using the Intersect option, the revolve operation trims the vase body using the thickened twisted surface. This isolates only the overlapping geometry and prepares the pattern for splitting and refinement.
Step 9 — Split Excess Geometry Using Vase Faces
Use the vase’s top and bottom faces as splitting tools.
Hide the extra trimmed sections above and below.
This guarantees the pattern stops exactly where the vase ends — no eyeballing.
The twist pattern is split at the top and bottom using the previously created offset planes. This creates cleanly segmented pattern pieces that fit neatly within the vase’s surface boundaries.
This close-up view focuses on the top of the vase after splitting the twisted surface body. With the main bodies temporarily hidden using the V shortcut, only the trimmed pattern segment remains visible. This makes it easier to inspect whether the split lines align cleanly with the vase’s opening and ensures the pattern will join correctly in the next modeling steps.
Step 10 — Shell the Vase
Shell from the top at 1 mm.
For printing, you can go thicker, but remember: layer height affects waterproofness more than infill.
The Shell tool is used to hollow the vase by selecting the top face and applying a 1 mm inside thickness. This ensures the vase has consistent wall thickness before adding the outer pattern. A common oversight here is accidentally shelling outward instead of inward—using the Inside direction keeps the external shape unchanged and prevents the patterned surface from separating later in the workflow.
Step 11 — Add Appearances Early
Add your colors now, before creating more bodies.
Use HTML color codes for consistent colors across projects, 3MF exports, and future variations.
Consistent color workflows = cleaner renders + faster edits.
The material appearance dialog is open in Fusion while adjusting a custom color for the twisted vase body. The Color Picker is set to an orange tone using the HTML field, which provides consistent color control across design iterations. Changing the appearance at this stage ensures the body updates correctly before creating patterns or duplicating geometry. The timeline shows earlier modeling steps already in place, so updating the color now helps maintain a clean, predictable workflow as the design becomes more complex.
Step 12 — Mirror the Pattern
Mirror the patterned body as a New Body.
Because it stays linked, any change to the original later updates the mirrored one automatically.
The Mirror command is active to duplicate the twisted vase surface across the vertical construction line. The object type is set to Bodies, and the operation is New Body to keep the mirrored half separate for later pattern work. Mirroring at this stage keeps the geometry clean and symmetrical, which helps when creating intersect or trim operations in the following steps.
Step 13 — Save a Restore Point
Save with a short version description.
This is useful before heavy pattern operations.
The Save dialog is used to create a version checkpoint right before generating the circular pattern. This is a proactive step because complex patterns can trigger heavy calculations, which may slow down or crash a system depending on hardware. Saving beforehand protects your progress and keeps the workflow stable as the file becomes more computationally demanding.
Step 14 — Apply a Circular Pattern Around the Vase
Use a Circular Pattern to duplicate both patterned bodies around the central axis.
This is where the design “clicks” — the full twisted pattern reveals itself.
The Circular Pattern tool is used to replicate the two surface bodies around the vertical axis, building the full twisted structure. The pattern type is set to Bodies with a quantity of 18, which evenly distributes the geometry around the vase. Adjusting the count updates the spacing and overall visual rhythm of the pattern, so this step is often tested with different values to find the cleanest result before committing.
Step 15 — Define a Clean Top Edge
Start a sketch on the top face.
Use Sketch Project to capture the patterned edge.
Offset the curve by 3 mm to create a sharp decorative band.
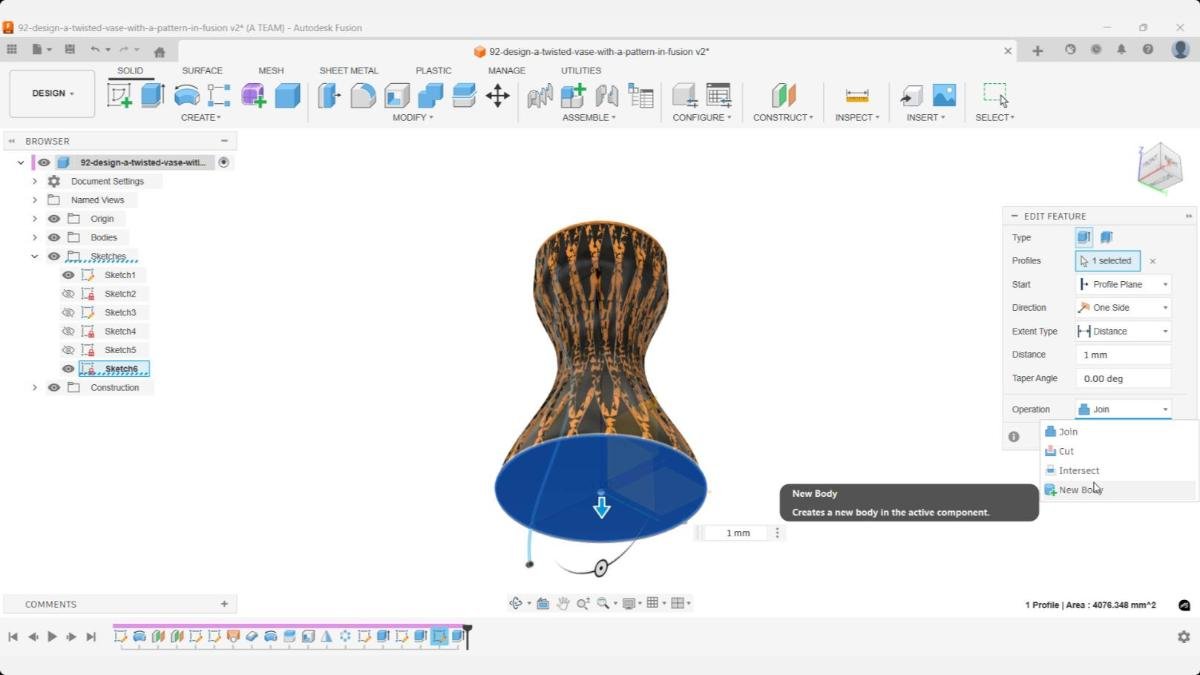
Extrude Cut to open the top.
If it accidentally becomes a Join operation, revisit the feature in the timeline and switch to New Body.
A new sketch is created on the top plane after generating the full circular pattern. A reference circle is drawn from the center using projected geometry to lock the sketch to the model. This circle provides a clean edge for the cut operation that follows. Working from the top view ensures accurate alignment with the patterned bodies and avoids small alignment errors that can appear in angled views.
The 1 mm extrusion is created from the top sketch, but the operation is switched from Join to New Body. This prevents the patterned geometry from merging with the cap, which cause the orange-and-black material blending seen in the image. Keeping the top as its own body preserves clean materials, keeps the pattern bodies independent, and avoids unintended geometry merges before the final cut operation.
A negative extrusion is applied to the top sketch profile to remove material and open the vase. The operation is set to Cut, targeting the patterned bodies and the separate top cap created in the previous step. Using Cut here produces a clean, circular opening that intersects evenly with the patterned geometry, ensuring the top edge stays sharp and consistent around the entire circumference.
Step 16 — Create the Base Detail
Start a new sketch on the bottom.
Project a single point to lock onto the center — a cleaner alternative to projecting full edges.
Draw a circle from the center to the projected point.
Again, if you accidently set it to a Join operation, edit the feature via the timeline and switch to New Body.
Sketch Project is used to bring in just one reference point from the patterned geometry. This is an alternative to the earlier workflow where a sketch line was projected. Using a single projected point keeps the sketch cleaner and still provides an exact positional reference for setting the opening size or guiding the offset curve.
A circle is sketched on the top plane using the previously projected single reference point to define its radius. This keeps the sketch minimal and controlled while still locking the circle precisely to the patterned geometry. Using a point instead of projecting full edges provides a clean, simple reference for setting the exact opening size before cutting the top of the vase.
A 1 mm extrusion is created from the bottom sketch, but the operation is switched from Join to New Body. This prevents the new base surface from merging with the patterned vase geometry, which would mix materials and make later edits harder to control. Keeping the base as a separate body preserves clean appearance assignments and gives you more flexibility for upcoming modeling steps.
Step 18 — Edit the Original Spline to Reshape the Entire Vase
Go back to Sketch #1.
Adjust the spline — watch the entire pattern update automatically.
This is the power of a parametric workflow.
The initial sketch is reopened through Edit Sketch in the timeline. Because this sketch defines the base proportions of the vase, any changes made here automatically propagate through every dependent feature—mirror, surface creation, thickening, and the full circular pattern. Since the entire workflow is parametric, updating this first sketch affects everything downstream in the timeline, allowing large design changes without manual rebuilding.
Step 19 — Change the Loft Angles for New Variations
Edit the guide-line angles on the top and bottom planes.
Changing these instantly gives the vase a new twist style or motion effect.
It’s a fast way to create multiple product variations or 3D-printable sets.
The sketch that contains the guide lines for the lofted surface is reopened using Edit Sketch. These lines control the overall twist and flow of the vase, so adjusting them affects every downstream feature—surface creation, mirroring, thickening, and the circular pattern. Because the workflow is fully parametric, updating this guide sketch reshapes the entire model.

Inside the loft guide sketch, the angle of the guide lines is adjusted from 135 degrees (step 5) to 160 degrees. These lines define how the surface bends and how the patterned bodies twist around the vase. Even small changes to this angle immediately affect the character of the loft and, by extension, the entire pattern.
After finishing the guide sketch, Fusion regenerates the entire model with the new angles. The pattern’s twist updates automatically across all patterned bodies, demonstrating the advantage of a parametric setup—one sketch adjustment reshapes the full design without manual rebuilding.
Key Takeaways
- A fully constrained sketch keeps the whole model stable
- Splines with overshoot give you perfect trim control
- Surface Loft is ideal for flowing open-curve patterns
- Intersect trims cleaner than manual cutting
- New Bodies preserve appearances and multicolor slicing workflows
- Sketch Project ensures perfect alignment for detail features
- Parametric edits let you generate new variations instantly
- Mirror + Circular Pattern = fast, clean symmetry
- HTML color codes keep your designs visually consistent
⏱ Chapters
- 00:07 Building the Base Sketch
- 01:51 Revolving the Vase Body
- 02:13 Setting Up the Offset Planes
- 02:39 Sketching the Guide Lines
- 03:31 Creating the Curved Surface
- 03:54 Thickening the Surface
- 04:19 Trimming the Pattern With Revolve Intersect
- 04:54 Splitting the Pattern to Match the Vase
- 05:35 Hollowing the Vase
- 05:51 Adding Appearances Early
- 06:10 Using Custom HTML Color Codes
- 07:02 Mirroring the Pattern
- 07:25 Saving Before Heavy Operations
- 07:35 Creating the Circular Pattern
- 08:05 Adding the Top Ribbon
- 08:36 Fixing a Join Operation
- 09:02 Cutting the Top Opening
- 09:52 Adding the Base Detail
- 10:27 Fixing Join Operations and Adding the Base Appearance
- 11:05 Saving Before Timeline Edits
- 11:16 Parametric Edits for a New Look
You Might Also Like
If you enjoyed this Fusion project, here are three more beginner-friendly designs that explore surface modeling, patterns, and clean printable geometry — all great practice for building your Fusion skills.
Each tutorial walks through a complete modeling workflow — from sketching and surface setup to patterning and clean printable geometry — helping you build confidence and speed inside Fusion.